
Table Basting Tutorial
In our previous home, I had enough tiled flooring that I could baste my quilts on the floor but oh, how my back and knees would hurt for days afterwards. In our current house, the only space big enough for me to baste a quilt on the floor is our bedroom, but it's a beautiful hardwood and I don't want to mar the floor with pin scrapes. Plus, I'd still have to move the bed a bit depending upon the size of the quilt.
That's why I figured out a different way to baste my quilts - one that doesn't hurt my back and knees. I use my kitchen table. Of course, this table has some wear and tear so if it gets a few minor pin scratches, they're not that visible and I don't care. I would NOT recommend doing this on your good dining table unless you have some sort of pad underneath. Here's how I do it.
1. I find the center of the table and use toothpicks and painter's tape to make an X in the center:
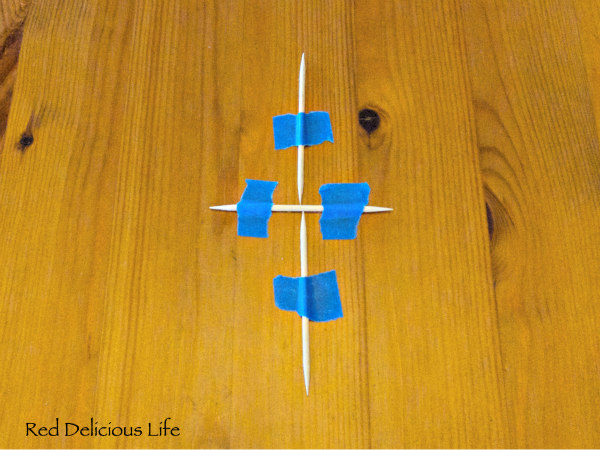
This allows me to feel where the center is when I have fabrics and batting on top of the table. You could also use small sized double pointed knitting needles, or even bamboo cooking skewers.
2. I press my backing fabric and my top and then fold them both in fourths to find the exact center of each piece, even taking my iron to that little corner so that when I open it up I have a nice visible X in the center of the each piece of fabric. I lay the backing fabric right side down on the table, centering it feeling for the toothpicks underneath and then use large plastic clamps to secure it to the table. I purchased my clamps in 2 different sizes very cheaply from Harbor Freight and Tool.
3. I then place my batting on top of the backing fabric. It's harder to see the center crease in the batting so I use a safety pin to indicate the center. I smooth it over the backing fabric and remove each clamp and replace in onto both layers. Once both layers are securely clamped in place, I remove that safety pin. You can still feel the toothpicks underneath both layers.

4. Lastly, I lay the quilt top on the table, finding the center toothpicks. I smooth it all out and again remove each clamp one at at time, and re-clamp it including the top. I do opposite sides to keep everything as straight as possible.

Before I start pinning, I go around the edge to make sure that there is extra batting and backing fabric all the way around. There's nothing worse than getting everything pinned and realizing that one of the layers wasn't centered and there is one corner that doesn't have backing fabric. Trust me, I learned this the hard way.
5. Start pinning away! I work my way from the center to the outside edges of the table. Then I unclamp everything, and gently slide the quilt in one direction. I smooth it, and re-clamp it, and pin one end. Then I do the same to the other 3 sides. Then I have this:

6. The last thing I do is I start at one end and feel underneath the quilt to make sure that each pin went through all 3 layers (which they did, hooray)! This took me about 2 hours total, including the pressing and cutting of the backing and batting.
Now comes the fun part - the quilting!
That's why I figured out a different way to baste my quilts - one that doesn't hurt my back and knees. I use my kitchen table. Of course, this table has some wear and tear so if it gets a few minor pin scratches, they're not that visible and I don't care. I would NOT recommend doing this on your good dining table unless you have some sort of pad underneath. Here's how I do it.
1. I find the center of the table and use toothpicks and painter's tape to make an X in the center:
This allows me to feel where the center is when I have fabrics and batting on top of the table. You could also use small sized double pointed knitting needles, or even bamboo cooking skewers.
2. I press my backing fabric and my top and then fold them both in fourths to find the exact center of each piece, even taking my iron to that little corner so that when I open it up I have a nice visible X in the center of the each piece of fabric. I lay the backing fabric right side down on the table, centering it feeling for the toothpicks underneath and then use large plastic clamps to secure it to the table. I purchased my clamps in 2 different sizes very cheaply from Harbor Freight and Tool.
3. I then place my batting on top of the backing fabric. It's harder to see the center crease in the batting so I use a safety pin to indicate the center. I smooth it over the backing fabric and remove each clamp and replace in onto both layers. Once both layers are securely clamped in place, I remove that safety pin. You can still feel the toothpicks underneath both layers.
4. Lastly, I lay the quilt top on the table, finding the center toothpicks. I smooth it all out and again remove each clamp one at at time, and re-clamp it including the top. I do opposite sides to keep everything as straight as possible.
Before I start pinning, I go around the edge to make sure that there is extra batting and backing fabric all the way around. There's nothing worse than getting everything pinned and realizing that one of the layers wasn't centered and there is one corner that doesn't have backing fabric. Trust me, I learned this the hard way.
5. Start pinning away! I work my way from the center to the outside edges of the table. Then I unclamp everything, and gently slide the quilt in one direction. I smooth it, and re-clamp it, and pin one end. Then I do the same to the other 3 sides. Then I have this:
6. The last thing I do is I start at one end and feel underneath the quilt to make sure that each pin went through all 3 layers (which they did, hooray)! This took me about 2 hours total, including the pressing and cutting of the backing and batting.
Now comes the fun part - the quilting!
I think maybe it would work on my table after all as the clamps are quite big, the depth I have is 4.5".
ReplyDeleteWill look out for some clamps now, fingers crossed it will work as the floor is not big enough for large quilts and certainly my knees do not like it.
Marking the center of the table is a great idea and something I had not seen before!
ReplyDeleteClever, clever, clever. I love learning how people find practical and simple solutions to our common problems. This is a good one!
ReplyDeleteCentre marking – great idea! My tables won't work, but one day – if I ever buy a trestle table – I hope I'll keep the marking trick in mind.
ReplyDeleteThanks for sharing this link, your method is absolutely amazing!
ReplyDeleteWhat sizes of clamps do you use?
ReplyDeleteI prefer the 4" clamps like the ones found here: https://www.walmart.com/ip/Hyper-Tough-4-Piece-4-inch-Spring-Clamp-Set/153984941
DeleteDo the clamps stretch the batting where it’s clamped?
ReplyDeleteNo, but I don't try to overly stretch it either.
Delete